
 1653
1653
Zoom Room Set Up – Zoom Account Settings
Turn on and use the waiting room
This feature will allow you to move participants into a waiting room temporarily until you are ready
to admit them back into the main session. This is another option to use as a warning before removing a student completely from the session.
1. Log into the website entry for Zoom Settings
-
Log In Here: https://zoom.us
-
Sign in with Google
2. Select Settings
3. Click In-Meeting (Advanced)
4. Make sure Waiting Room is turned ON (highlighted blue)
-
Click the pencil icon to customize with your course name and school logo and any other information you would like them to see before you log-in
- 5. This setting will now automatically be in effect for all zoom meetings

6. When opening your meeting, click on Manage Participants
7. Click Admit All

8. If you would like to move participants into the waiting room during the meeting, click Manage Participants
9. Click More next to the participant’s name and chose “Put in Waiting Room”

Remove ability for participants to change their name in meeting
This will block students from renaming themselves on their end. You are still able to rename any individual student as you desire.
1. Log into the website entry for Zoom Settings
-
Log In Here: https://zoom.us
-
Sign in with google
2. Select Settings
3. In Click In-Meeting (Basic)
4. Make sure the Allow participants to rename themselves is off

Turn off Participant Screen Sharing
This setting will ensure students are not able to share their screen during the meeting and teachers will continue to have screen share control. This will support a smooth session with fewer interruptions
1. Log into the website entry for Zoom Settings
-
Log In Here: https://zoom.us
-
Sign in with Google
2. Select Settings
3. Click In-Meeting (Basic)
4. Make sure Screen sharing is turned ON (highlighted blue)
5. Under Who can share? Select HOST ONLY
6. Click Save
7. This setting will now automatically be in effect for all zoom meetings

Make Participant the new Host
This transfers the Host Role from your account (or whoever started the meeting) to the desired participant like your co-teacher or co-facilitator.
1. To use this function – during the meeting select manage participants
2. hover your cursor over the participant you want to make the Host click MORE then click Make Host

Removing Participants out of Zoom
This feature will remove students from the zoom room permanently (unlike hold or a waiting room)
if needed. This should be used for send-outs.
1. In the session, Click Manage Participants
2. Hover over a participant and click “MORE”
3. Select Remove
4. Click OK

Mute individual participant
This will block students from unmuting themselves on their end in the case a student becomes disruptive. You are still able to unmute any individual student as they raise their hand or you want to call on them. This will support a smooth session with fewer interruptions
-
Click on Manage Participants
-
hover your cursor over the participant and click on the Mute button

Turn off Embedded password in meeting link
This will encrypt the meeting password and include it in the join meeting link to allow participants to join with just one click without having to enter the password.
1. Log into the website entry for Zoom Settings
-
Log In Here: https://zoom.us
-
Sign in with google
-
2. Select Settings
-
3. Schedule Meeting
-
4. Make sure Embed password in meeting link for one-click joins turned OFF

Mute upon entry set up
This will block students from unmuting themselves on their end. You are still able to unmute any individual student as they raise their hand or you want to call on them. This will support a smooth session with fewer interruptions
1. Log into the website entry for Zoom Settings
-
Log In Here: https://zoom.us
-
Sign in with google
2. Select Settings
3. Click on schedule meeting header
4. Scroll down to Mute participants upon entry
5. Make sure Mute participants upon entry is turned ON (highlighted blue)
6. This setting will now automatically be in effect for all zoom meetings

Turn off inter-participant chat feature
This will block students from chatting individually with one another or the whole group. Students are still able to send chats to you as the teacher. This will support a smooth session with fewer interruptions.
1. Log into the website entry for Zoom Settings
-
Log In Here: https://zoom.us
-
Sign in with google
-
Select Settings
-
Click In-Meeting (Basic)

-
5. Make sure Chat is turned ON (highlighted blue)
-
6. Make sure Private Chat is turned OFF (highlighted grey)
-
7. This setting will now automatically be in effect for all zoom meetings
Turn on Auto Save Chat feature
This feature will automatically save the chats from your meeting in local computer. In order for this function to work, the session must be recorded. This feature is helpful to respond to questions or comments after the meeting you may not have been able to get to during the session.
1. To set up AutoSave Chat Feature
-
Log into the website entry for Zoom Settings
-
Log In Here: https://zoom.us
-
Sign in with Google
-
Select Settings
-
Click In-Meeting (Basic)
-
Make sure Autosaving chats is turned ON (highlighted blue)
-
This setting will now automatically be in effect for all zoom meetings

2. To access your saved chats
-
Log into the website entry for Zoom Settings
-
Log In Here: https://zoom.us sign in with google
-
Select Recordings
-
Click on the meeting

-
This will show all files for your meeting. You can download, share or delete the TXT file called In-Meeting Chat

Turn off student annotations
This setting will ensure students are not able to annotate on your shared screen during the meeting. This will support a smooth session with fewer interruptions.
1. Log into the website entry for Zoom Settings
-
Log In Here: https://zoom.us
-
Sign in with Google
2. Select Settings
3. Click In-Meeting (Basic)
4. Make sure Annotation is turned OFF (highlighted grey)
5. This setting will now automatically be in effect for all zoom meetings

Turn off Whiteboard
A whiteboard is similar to a screen share. Turning this off will ensure students are not able to share a “Whiteboard” during the meeting. This will support a smooth session with fewer interruptions
1. Log into the website entry for Zoom Settings
-
Log In Here: https://zoom.us
-
Sign in with Google
2. Select Settings
3. Click In-Meeting (Basic)
4. Make sure Whiteboard is turned OFF (highlighted grey)
5. This setting will now automatically be in effect for all zoom meeting

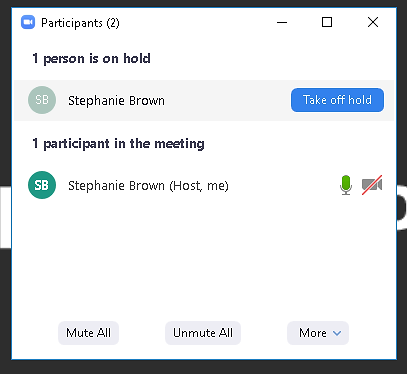
Put attendee on Hold
This setting will allow you to move a participant out of the zoom room temporarily until you admit them back into the meeting. This could be used as a warning before removing a student completely from the session.
1. Log into the website entry for Zoom Settings
- a) Log In Here: https://zoom.us/signin
- b) Sign in with Google
2. Select Settings
3. Click In-Meeting (Basic)
4. Make sure Allow Host to put attendee on hold is turned ON (highlighted blue)
5. This setting will now automatically be in effect for all zoom meetings

-
To use this function – during the meeting select manage participants
-
Hover over the name of the attendee you want to put on hold. Click “MORE,” then “Put on Hold”

-
Click “take off hold” on the participants list whenever you are ready to bring them back into the meet
Turn off virtual background
This setting will ensure students are not able to put up a photo or virtual background behind
them during your meeting. This will support a smooth session with fewer interruptions.
1. Log into the website entry for Zoom Settings
-
Log In Here: https://zoom.us
-
Sign in with Google
2. Select Settings
3. Click In-Meeting (Advanced)

4. Make sure Virtual Background is turned OFF (highlighted grey)
5. This setting will now automatically be in effect for all zoom meetings
Turn on and use waiting room
This feature will allow you to move participants into a waiting room temporarily until you are ready
to admit them back into the main session. This is another option to use as a warning before removing a student completely from the session.
1. Log into the website entry for Zoom Settings
-
Log In Here: https://zoom.us
-
Sign in with Google
2. Select Settings
3. Click In-Meeting (Advanced)
4. Make sure Waiting Room is turned ON (highlighted blue)
-
Click the pencil icon to customize with your course name and school logo and any other information you would like them to see before you log-in
5. This setting will now automatically be in effect for all zoom meetings
6. When opening your meeting, click on Manage Participants
7. Click Admit All
8. If you would like to move participants into the waiting room during the meeting, click Manage Participants
9. Click More next to the participant’s name and chose “Put in Waiting Room”
Setting Up A Meeting
Login Instructions and Scheduling a Meeting
1. Open Zoom from https://zoom.us
2. Choose: Sign In → Sign In with Google
3. Click on Schedule a Meeting
4. Choose: Schedule
-
a. Topic: [Teacher]’s [Course Name] Class
i. Ms. Fox’s English III Class, Ms. Castro’s Algebra I Class
-
b. Duration: no limit
-
c. Time Zone: Eastern Time
-
d. After Topic, Duration, and Time Zone, choose: Recurring Meeting
-
e. Video: Host On, Participants On
-
f. Audio: Telephone and Computer Audio
-
g. Advanced Options: Mute Participants on Entry

5. Choose: Save
6. Update the recurrence (daily, weekly, etc.) in Google Calendar by clicking Add to Google Calendar option.
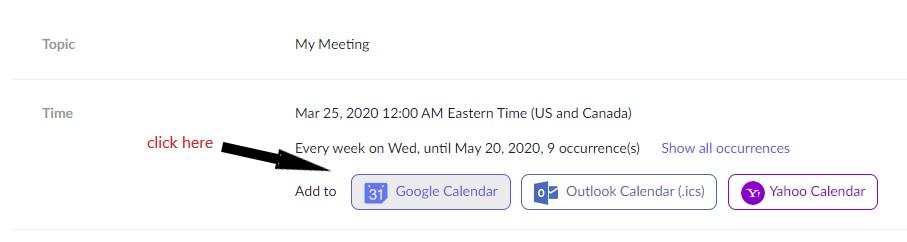
7. You can also Copy the hyperlink and Meeting ID in Google Classroom or in an email .
Recording & Uploading Lessons on Zoom
1. Follow the Zoom Room Set Up Instructions included in this guide FIRST to prepare your zoom room
2. Start the meeting by clicking on the meeting link.
3. Choose: Join with Computer Audio
-
Note that as soon as you click, you are both visible and audible.
4. Click on “Record” at the bottom of the screen to begin recording the lesson.
5. During a lesson:
-
Use “Mute” to prevent others from hearing what you are saying.
-
Use “Stop Video” to prevent others from seeing you.
-
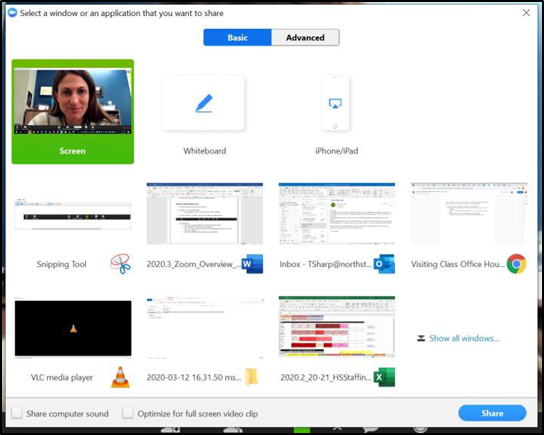
Use “Share” to allow others to see documents, spreadsheets, slides, and other files open on your laptop.
i. Close all non-essential documents or platforms (personal info, grade books, personal websites, etc.) before sharing your screen to prevent accidental sharing of confidential or sensitive information.
ii. Anything shared is visible in the recording.
iii. Choose “Stop Share” to end the screen share.
-
Use “Chat” to allow meeting participants to respond to or ask questions or to share
directions or stamps in writing. Participants can Chat with “Everyone” or “Host Only.”
i. Chats are not visible in recordings.
ii. Private chats between students should be turned off – please follow the directions in the Zoom Room Set Up section below to disable this feature
6. Choose “Stop Recording” at the end of the lesson.
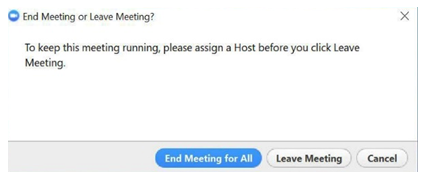
7. Choose: End Meeting for All
8. Allow recording to be converted automatically to an MP4 file.
9. Rename the “zoom” file in the auto-populated folder following aligned naming convention.
- a. Year.Month.Day_Course_Unit/Lesson_Teacher_File “2020.3.16_EnglishIII_U8L15_Fox_SHO” “2020.3.16_AlgebraI_U9L3_Castro_ClassNotes
10. Post the renamed video file to Google Classroom.
Enable Join from Browser Option for participants
1. Log into the website entry for Zoom Settings
-
Log In Here: https://zoom.us
-
Sign in with Google
2. Select Settings
3. Click In-Meeting (Advanced)
4. toggle on the Show a join from your browser link

Zoom Room Set Up – In Session Settings
Mute all feature in session
If you start a meeting that does not have participants muted upon entry -use this in session solution
to quickly mute all participants. This will support a smooth session with fewer interruptions.
1. When zoom meeting is in session, select Manage Participants
2. Select Mute All
3. You will be prompted to Allow participants to unmute themselves. Unselect and click yes (or continue)

Turn off video for specific students
If students are not dressed appropriately or for any reason need their video turned off while in the
session follow the below directions to shut off specific student’s video.
1. Select Manage Participants
2. Hover over the camera icon for that student and the “More” button will appear
3. Click More
4. Click Stop Video

Turn off change name feature
This setting will ensure students are not able to change their names in the zoom room. This will support a smooth session and allow you to know who is on your call, responding, and interacting.
1. Click on Manage Participants
2. Click on More in the bottom right corner of the participant's box
3. Unclick “Allow participants to rename themselves”

Hand Raise Function Set Up and Use
This feature allows students to raise hands virtually, just like in a classroom setting. It allows teachers to call on students with raised hands. This will support a smooth session, giving you control and mirrors an in-person classroom.
1. Click Manage Participants
2. Here students can select Raise Hand at the bottom of the Participant window
3. Also, here you will see students with hand raised symbols
4. You can then select to unmute that student or chat with them privately

5. You will also see a hand raised in the right-hand corner of the participant’s video

Sharing Computer Audio
This setting will share the audio from your computer in addition to your voice. This is helpful when
playing video.
1. In the zoom session click Share Screen
2. In the bottom left corner of the share screen options select “Share computer sound”
3. This will share the audio from your computer in addition to your voice

Zoom Advanced Features and Tools
Utilizing Breakout Rooms
What are Breakout rooms? From ZOOM:

1. Step 1: Enable Breakout Rooms for your account
-
Log into the website entry for Zoom Settings
-
Log In Here: https://zoom.us/
-
Sign in with Google
-
Select Settings
-
Click on schedule meeting header
-
Click on In Meeting (Advanced)
-
Make sure Breakout Room is turned ON (highlighted blue)
-
Check “Allow host to assign participants to breakout rooms”
-
This setting will now automatically be in effect for all zoom meetings

2. To use Breakout Rooms:
-
In the meeting click Breakout Rooms
-
Select the number of rooms you would like to create, and how you would like to assign your participants to those rooms:
2. i. Automatically: Let Zoom split your participants up evenly into each of the rooms.
ii. Manually: Choose which participants you would like in each room.
-
Click Create Rooms
-
A breakout room window will automatically appear
-
Click Options at the bottom of the breakout room window to select additional breakout room settings:


-
To manually assign participants to your rooms, select Assign next to the room you wish to assign participants to and select participants you want to assign to that room. Repeat this for each room

-
Click start
-
As the host, you can select “Join” to enter any breakout room

-
When you want to leave one breakout room and join another you just click Breakout Rooms at the bottom of the screen again and the breakout room pop up window will appear
-
From the breakout room pop up window, you can leave the room you are in and enter another or close all rooms to have everyone join the main room
-
Click “close all rooms” when you are finished using breakout rooms and would
like everyone to come back together.
Screenshare Second Camera – Including Document Camera
This will allow you to display images from a second camera or doc cam.
-
In the meeting select Share Screen
2. Click the advanced tab at the top of the pop-up window

3. Click Content from 2nd Camera

4. Click Share
5. If you need to share a different camera, click Switch Camera at the top left of the screen
Turn on attention tracking
Use attention tracking to see which students do not have zoom open and active for 30 seconds or more. Please note, attention is only tracked during a screen share. If video is being used and your screen is not shared, this function will not work. During a screen share this will help you to know who is not looking at their zoom window.
1. Step 1: Enable attention tracking for your account
-
Log into the website entry for Zoom Settings
-
Log In Here: https://zoom.us/
-
Sign in with Google
-
Select Settings
-
Click on In Meeting (Advanced)
-
Make sure Attention Tracking is turned ON (highlighted blue)
-
This setting will now automatically be in effect for all zoom meetings

2. To use Attention Tracking:
-
In the meeting, click Manage Participants
-
A clock indicator will appear next to any participant who has not had the zoom window open and active for 30 seconds or more


